Difference between revisions of "Client Configuration"
Jump to navigation
Jump to search
m (added coralized pack updater warning) |
|||
| Line 156: | Line 156: | ||
;Nagles Algorithm for combining packets | ;Nagles Algorithm for combining packets | ||
:Choose from ON or OFF. Recommended settings is OFF. Setting this to ON will improve the efficiency of communication with the server, but it might cause some problems. | :Choose from ON or OFF. Recommended settings is OFF. Setting this to ON will improve the efficiency of communication with the server, but it might cause some problems. | ||
| + | |||
| + | ;Coralized Pack Updater | ||
| + | ;Choose from ON or OFF. Recommended to have this off unless you really need it - is known to often cause pack corruption and fail for seemingly random reasons upon startup. | ||
[[Category:Technical Details]] | [[Category:Technical Details]] | ||
[[Category:Babel/C]] | [[Category:Babel/C]] | ||
Revision as of 23:03, 13 October 2008
Main Page / Client Configuration
Contents
Introduction
This page explains the configuration options available in the Wurm Client login screen.
Click on the Options button on the Wurm Client Login screen to display the configuration options screens.
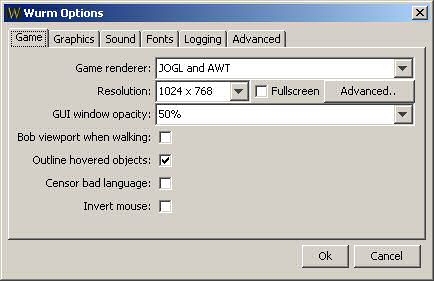
Game tab
|
- Game renderer
- You here have the choice between JOGL + AWT and LWJGL. If you have an ATI graphics card (Radeon series), you will want to use LWJGL renderer, or you will get a lousy fps no matter what you do.
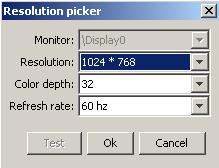
- Resolution
- Choose from the resolutions that are supported by your graphics card. Choosing a too low or too high resolution might effect performance. Some monitors have an optimal resolution. Wurm looks much better at higher resolutions so compare the performance at different settings.
- Fullscreen
- Play Wurm in a window or use all of the screen. Windowed and Fullscreen does not have much difference, fullscreen yields a little more performance, not really noticeable unless on an old computer; this may depend on your graphics card.
- GUI Window opacity
- The opacity of the interface windows. This can make screens like the inventory see-through, completely solid, or something in between.
- Bob viewport when walking
- Checked tickbox means that camera will bob up and down to simulate walking. This can be annoying as you cannot click objects while walking at the cost of performance. Recommended setting is OFF.
- Outline hovered objects
- Make the outline of objects under the cursor glow. Outline hovered objects: Minimal, if any negative effect on performance, have it on so you will have it easier to see what you are actually having under your mouse (sometimes you actually don't know without reading the text). Recommended setting is ON.
- Censor bad language
- Will censor bad language in a chat message. No effect on performance.
- Timestamps in chat
- Checked tickbox means that any chat windows will have the time printed next to a message. Recommended setting is ON. It helps keep track of when someone said something in the chat window. Minimal or no effect on performance.
- Loglevel
- set to Console only unless you want to log what people say, then choose the appropriate option to what you need. Setting to Everything will have effect on performance because there are more writes to the harddrive.
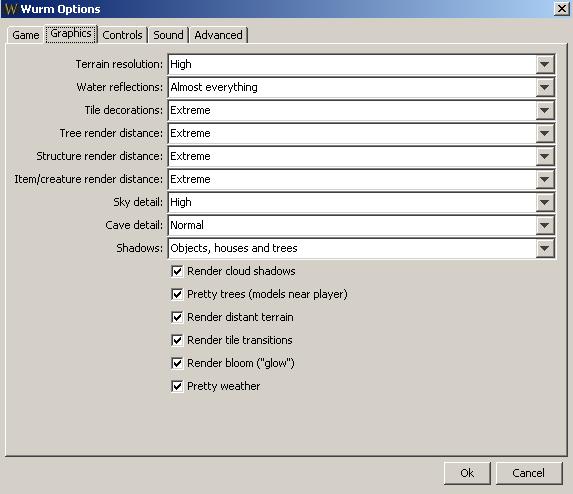
Graphics Tab
Note that setting all the graphics settings on the extreme settings is not recommended. It will result in poor frame rate on even the fastest systems.
- Terrain Resolution
- Choose from Low, Medium, or High. This has some effect on performance and affects the quality. More means more detailed landscape far away from you. If you appreciate a good view then use high unless your computer can't handle it. Settings medium and high also show rocks in the terrain.
- Water reflection
- Choose from None, "Sky only", "Sky and terrain", "Sky, terrain, and trees", "Almost everything". Have set to NONE unless you have a semi-old card (FX5600 or better at least) and a good CPU (AMD athlon 2000+, 2GHZ P4). It has a great effect on performance, turning it on will use a lot, but with a good comp it only gives a small drop in performance and it does make the water look nice.
Example screenshots: None | Sky only | Sky and Terrain | Sky, terrain and trees | Almost everything
- Tile Decorations
- Choose from Extremely sparse, Sparse, Normal, Dense, or Extremely dense. Have this set to Extremely Sparse for a performance boost. Using higher settings makes the game much prettier, but you also have a harder time finding anything on the ground, unless it is on/in dirt, road, water, rock or sand. Large performance drop if used. Using the extreme setting is not recommended, it will effect performance greatly.
Example screenshots: Extremely sparse | Sparse | Normal | Dense | Extremely dense
- Tree Render Distance
- Choose from Very short, Short, Normal, Far, or Extreme. The amount of trees you can see. Have set to Very Short to have best performance. However, structures, items and animals will not be rendered beyond the tree limit. Short or Normal are optimal for quality versus performance. Only use far or extreme when you have a good computer. Using the extreme setting is not recommended, it will effect performance greatly.
- Structure Render Distance
- Choose from Very short, Short, Normal, Far, or Extreme. The distance in which you can see structures. Set it to very short for a performance boost when you are in a (large) town. Set to Extreme if you want to see towns from quite a distance away. The maximum setting of this option is the setting of Tree Render Distance
- Item/Creature Render Distance
- Choose from Very short, Short, Normal, Far, or Extreme. Set this to very short for a performance boost. Setting this to extreme helps looking for items and creatures. The maximum setting of this option is the setting of Tree Render Distance
- Sky Detail
- Choose from Low, Normal, High. Set to high for more detailed clouds, but much less performance. Set to low for very crude clouds, but heaps of performance.
- Cave Detail
- Choose from Very Low, Low, Normal, High. Set to normal, the difference in performance from Low to Normal is minimal, and in a cave you don't need great performance mostly. Even set to the highest does not drop your performance too much.
- Shadows
- Set this to none for a great performance increase. Setting this to the highest setting will cause the client to render everything twice.
- Render Cloud Shadows
- Turn this off for a noticeable performance increase.
- Pretty trees (models near player)
- Have it ON unless it really makes the game unplayable. Performance versus Quality is worth it here.
- Render Distant Terrain
- Have ON unless it really makes the game unplayable. Great effect on performance, but good for spotting things early (like enemies).
- Render tile transition
- ON is prettier but it isn't essential as it only makes the Tile Border between tiles blend between the tiles. Turn it OFF to increase performance slightly.
- Render Bloom("glow")
- Set to OFF for performance. Very pretty, makes the game look great, but has a large effect on performance. Makes the game look...well, more lifelike, look at the sun and you will not see much :P The effects of this option depends greatly on your hardware (some users may experience a heavy performance drop, some close to none).
- Pretty weather
- Have OFF for performance. Performance will drop a great deal when it starts to rain, but on will make weather look nicer, but weather is really nice anyway so it´s up to you.
Controls
- Invert mouse
- Inverts the y-axis of the mouse control. No impact on performance whatsoever. Your own preference.
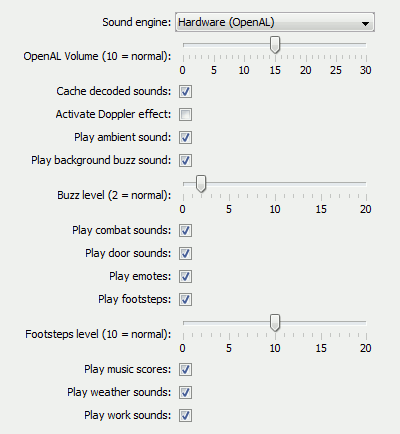
Sound Tab
|
- Sound Engine
- Choose from None (silent) and Software. This will cause sounds to be played for certain actions, if you have downloaded the optional packs. Your own preference.
Advanced Tab
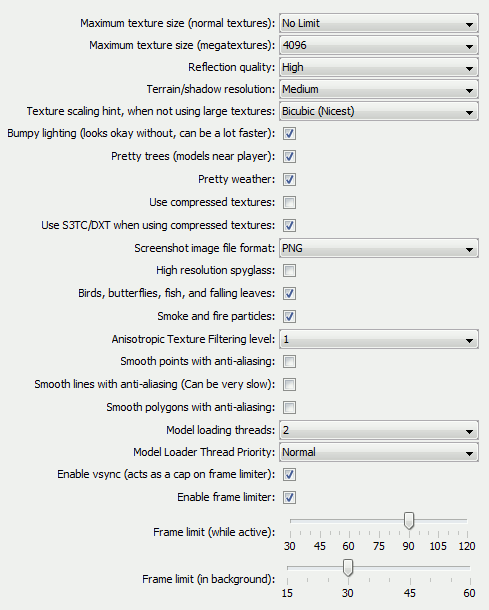
|
- Use Large Textures
- looks nicer but takes more video ram if enabled. Turn it OFF for a performance gain, but on if you want it prettier. If you have a lot of videoram use it! The gain in quality is great.
- Use PBuffers
- Use OpenGL (http://www.opengl.org/) hardware pixel buffers (http://oss.sgi.com/projects/ogl-sample/registry/ARB/wgl_pbuffer.txt) when rendering the display. Using PBuffers should give better performance as there is less data to be transferred between the CPU and graphics card. However, some graphics cards implement PBuffers in such a way that Wurm can crash. If this happens try disabling PBuffer support. Look in your console.log and check the "PBuffer support" and "PBuffer inited" lines. Refer to Client Log Messages for details of other console.log messages.
- Terrain bumpmapping
- Gives the terrain tiles a slight 3D look. Compare the performance with this turned ON and OFF! The performance drop may be so large that it may not be worth it for you.
- Use occlusion culling
- Will give a performance boost on some computers, mainly if you're inside buildings or behind larger objects. It spares the rendering of objects you can't see. On computers where it doesn't work, turn it OFF for a small performance gain.
- Use GLSL shaders if available
- With newer graphics card that supports it, this will make waves on water and make it look much more real and nice. If this gives you problems or you have a very slow computer, turn it off for a small performance gain.
- Use VBO if available
- Use OpenGL Vertex Buffers (http://oss.sgi.com/projects/ogl-sample/registry/ARB/vertex_buffer_object.txt). Only turn this off if you are having technical problems. Leave it on for performance.
- Fast Yield
- If turned on you can get a performance gain, but you can also have trouble writing and moving your mouse in-game, if no keyboard or mouse lag, have it on.
- Debug Mode
- Turn this off, it's mostly used by the developers to find bugs.
- Release OpenGL context each frame
- If you use LWJGL renderer, and/or have an ATI graphics card, you will want to enable this for a boost in fps.
New Client 2.4.0 settings (Work In Progress)
- Maximum texture size (Larger sizes use more memory)
- Choose from 256, 512, 1024 and No Limit. This setting has a heavy impact on performance and graphics quality. It effects the quality of all models in the game. If your video card has lots of memory, choose a high setting.
- Possible technical problems:
- Some video cards do not support a high setting.
- If you set a to high setting and your video card memory gets exceeded, your video card will start to swap textures often. This can causes stuttering or pauses in the game.
- Birds, butterflies, fish and falling leaves
- Choose from ON or OFF. ON looks nicer, OFF will give a trivial effect on performance.
- Nagles Algorithm for combining packets
- Choose from ON or OFF. Recommended settings is OFF. Setting this to ON will improve the efficiency of communication with the server, but it might cause some problems.
- Coralized Pack Updater
- Choose from ON or OFF. Recommended to have this off unless you really need it - is known to often cause pack corruption and fail for seemingly random reasons upon startup.
