Tutorial2
| Note: This article is the opinion or suggestion of one or more players. Information in player-made guides are not maintained by the Wurmpedia staff. It is subject to player opinions, and information may not be factually accurate or up-to-date. For updated game mechanics information, check the main namespace articles. |

Contents
Welcome
This tutorial is supposed to help you get started if you are new, or supply a quick refreshment if you've forgotten how to play.
After each section, you will find links to related articles you may want to look at.
Creating an Account
The first thing you want to do is to create a valid account. To do this, go to the Wurmonline webpage and click Register. You will be asked for a Player name and an email address. Please note that the player name can only contain alphabetic characters and no spaces. All letters in the name but the first one will be in lowercase.
You will then receive an email to the address you supplied. This welcoming email will include a completion link that will take you to the page where you choose your password and challenge phrase. Once this step is complete, you may start the game by going back to the main webpage and clicking the 'Launch' image.
You must have the latest Java platform installed on your system to play Wurm Online. You can get Java here.
[ Common bugs and solutions | Client Configuration ]
The Interface
When you start Wurm for the first time you will be greeted with a Basic Game Play message, scroll down and click send. The interface consists of 6 major components, only 2 are visible by default. The entire User Interface can be turned on or off by pressing F10.
Statusbar

- Green: Stamina - Your stamina will decrease while doing fatiguing tasks and increase while resting.
- Red: Damage - Your wounds and health are displayed here. When the bar goes all red, you're dead.
- Blue: Water - How much water you have in your body. This controls how fast you regain your stamina.
- Orange-green: Food - How hungry you are. When this bar is full, so are you. Your hunger controls whether you can do hard work such as digging and chopping trees or not.
You cannot die from thirst or hunger, but you won't be able to perform many tasks.
Hovering the mouse over any of these bars will give you a percentage (%) level and your nutrition level.
Note: All foods can fill you up, but they will only fill up your nutrition so far which has many positive effects when high, and many negative when low.
The status bar group can be clicked and dragged to a position of your choosing.
Chatbox and Eventlog

In the lower left is the chatbox, here you can communicate with other players and send special slash-commands (/help) to the eventlog. By clicking on the 'Jenn-Kellon' Kingdom tab, you can talk globally to all players on the same server in your Kingdom. If the Jenn-Kellon/HotS/Mol-Rehan chat tab is not available, you can type /shout <message> in the local channel to open it.
In the lower right is the eventlog. All nearby and global events are listed here.
There are three buttons in this window;
- Climbing allows you to climb on steep areas as long as you have enough stamina.
- Faithful controls whether or not you can go against the will of your god. (When you start, you are not aligned to any god.)
- Lawful controls whether or not you can go against the law of your current area.
- Stealth attempt to hide yourself from the environment
Next to the buttons are info displaying your Fighting mode, how hungry or thirsty you are, if you are fighting, hurting, etc..
Double clicking in the bar area to the right of the tabs will minimize or restore these windows.
Skills window
The skills window is accessed by pressing F2. This will display all your skills and how good you are at it. More skills will be available as you uncover them. By pressing the plus, [+] you can expand the skill tree.
Hovering the mouse over any of the skills will display you a more precise value.
Inventory window
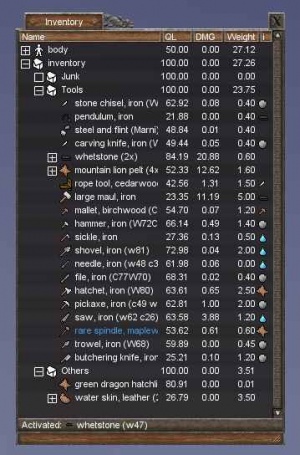
Aah, the good stuff. Press F3 to bring your inventory window up.
The body tree will display all the equipment you have equipped and all the wounds you have acquired.
The inventory tree displays all items, you have gathered. You will start with some basic low-quality items.
Console window
The console is brought up by pressing the F1 key. There are not many commands of use in the console at this time. You can find more information about the console here Console
Compass
If you have acquired a compass and put it in your inventory, the compass will be visible next to your stamina bar. The compass (and most user interface objects) can be clicked and dragged to a position of your choosing.
[ Climbing | Faithful | Lawful | Inventory | Console | Compass ]
The first steps
I assume you must be eager to get started, so here we go.
You move around with the W-A-S-D keys, alternatively the arrow keys. To look around, you hold the left mouse button and move the mouse. You can auto-walk by pressing X. Your food and water bars may have decreased a bit while you have been reading this.
You will find a few NPCs (Non-Player Characters) in your starting town, such as traders and bartenders. Interact with a bartender by rightclicking him and click Ask for refreshment once the menu has loaded. This NPC will give you free food and water until you have played for longer than 24 real-life hours. You can check how long you have played by entering /time in the chatbox. Wurm game time is 4x faster than real time.
[ Deed ]
Gearing up
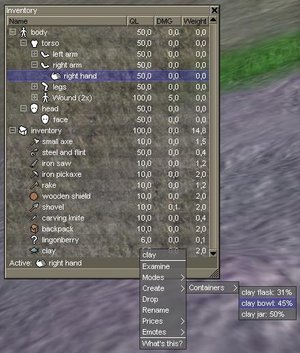
Before you leave the safety of your starting area, you should gear up. To equip your items: Open the inventory (F3)and expand all trees (click the +'s). Now click and drag the Wooden shield onto your Left arm. Put your starting weapon in your right hand, and drag the Backpack to your torso.
Your equipped shield will help block attacks, and you will use your weapon to attack.
You are now ready to head out on your first Quest. (There are no quests in this game, you make them up yourself!)
Your first Quest is to find clay in order to make a Pottery bowl.
The Quest for clay
Take a look at the token outside the buildings, it has a sundial and a compass. Make a mental note of which direction is which.
If you ask in the local chatbox, someone might be able to give you the directions to the nearest claypit. Otherwise, look around near the shores and beaches. This is where clay is found. Don't worry if you fall into the water, you know how to swim though be aware that you can also drown so don't go to far out.
You probably spotted some creatures along the shore, it is advised you stay away until you have some decent skills and weapons. Be extra careful around bears and rats, as the can swim.
As you may have noticed, you walk at different speeds on different tiles, other things that may slow you down is:
- You left the climb button on
- You have no stamina and must rest
- You have got a wound and is hurting
- You are carrying too much
- Ground Type
Hazards
As mentioned above, exploring is not without risk. There are several hazards and creatures to look out for. Some of them is mentioned below.
- Caves - The most common newbie killer is the caves with locked gates in the entrance, careless players might fall into the cave and never get out. The only option is to use the /suicide command.
- Pits - A bit less common, if lucky, you might just be able to climb out.
- Huge Spiders - Keep on a distance at all costs. Can be outrunned on paved roads.
- Bears and rats - Most creatures can't swim, so you are safe in the water... but these can.
- Thorn bushes - Walk through them and they'll tear you apart.
- Steep hills - Steep hills and cliffs may give you minor foot wounds, but a long hill might just kill you.
Your first piece of art
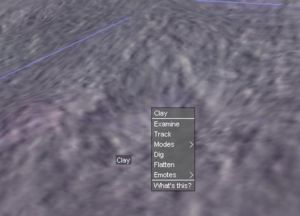
Open up your inventory again and activate the shovel by doubleclicking it. Stand on a clay tile, rightclick, and choose dig. You should now start digging clay unless the tile is too steep. If all you get is dirt, drop the dirt by using the rightclick-dropdown menu and move to another clay tile.
Once you've finished digging, the clay should be in your inventory. Open your body tree and activate your hand the same way as you activated the shovel, then rightclick the clay and choose Create > Containers > Clay bowl The percentage to the right tells you how large the chance of success is.
You may have to repeat the create step a few times until you succeed in creating a clay bowl. You may also want to create a clay jar to store water in. Don't mind the unfinished ones yet.
Some items such as clay or wood scrap can be combined to create a larger single item. To do this, activate one of the items and choose Combine in the dropdown on the other item of same type. You can combine up to 11 items at the same time by opening the pile tree and activating the last item in the pile, then combining it with the tree item you expanded ([-] Pile of wood scrap).
[ Digging | Clay Bowl | Clay Jar ]
Making a campfire
To make a fire, you need to find a tree. The best trees for fire is old Pine trees, as they have large amounts of wood. To see how old the tree is, rightclick the tile it's on and select Examine.
Activate your axe the same way as you activated your hand, and choose Cut down on the tree tile. It may take several cuts to cut down a tree, you can examine the tree to see how much damage it has. When it reaches 100, it falls.
With the axe active, rightclick the felled tree and chop it up into logs. (If the tree's weight was less than 25kg it would turn into a log instantly.) Rightclick the log and take it. Activate the carving knife and create a kindling.
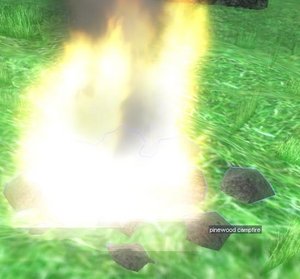
Once you have a kindling, activate Steel and flint and use it on the kindling to create a campfire container. If this step fails, just make a new kindling from the remains of the log or some wood scrap.
Examine the campfire to see how much firewood is available. If it doesn't say The fire burns steadily... It's suggested you feed the fire with a log (or any other wooden item) by activating the wood and select Burn on the campfire dropdown.
Now, when you have your nice warm fire, rightclick it and select open, then drag your clay bowl into the campfire container. It will take a great time for the clay bowl to harden into a pottery bowl, so make sure you keep the fire alive. You can continue with the next section while the clay hardens.
[ Felled Tree | Log | Kindling | Campfire | Pottery Bowl | Pottery jar ]
Feeding yourself
Finding food is relatively easy, however, you won't stay full for long on just berries and parsley.
You have 5 ways of getting food;
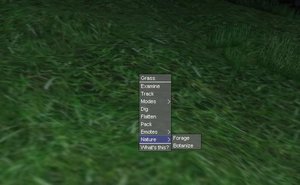
- Foraging and Botanizing by going Nature > Forage/Botanize on grass tile. This gives you seeds, berries, herbs, and even potatoes or corn. But, a grass tile can only be foraged and botanized once every 24 hours, don't be surprised if you don't find anything!
- Fishing on tiles with water by using a fishing rod. You can either make the rod yourself, or trade for one.
- Hunting and butchering killed animals for meat, pelts and other items.
- Farming sowed fields with various farming tools.
- Trading money or items for food.
Raw items have very poor nutrition and will lower it till 5-10%. Cooking is done by heating ingredients and putting them in a pottery bowl, frying pan or a cauldron etc..
Put some ingredients in the pottery bowl you made earlier by dragging them onto the bowl, then examine the bowl to see what kind of food the mix will make. Once you're satisfied, put the bowl back into the fire and wait. Again, this may take a long time depending on the quality, QL, of the items. When the food is ready, you'll see that the ingredients has turned into one.
Different ingredients in different containers makes different foods, such as meals in a frying pan, gulasch in a sauce pan, porridge, stew, soup.
[ Guide To Cooking | Fishing | Fishing rod | Farming ]
Treating wounds
You probably have gotten some wounds by now, don't worry, most of them will heal by themselves.
To heal a more serious wound such as a severe or a bad one, you must to use Cotton on the wound, or the wound might get worse and eventually kill you.
Creating a healing cover
Some foraged and botanized items may be used in alchemy to create healing covers. Healing covers will, as the name says, help heal your wounds faster.
If you find some herbs of different types such as garlic or parsley, you may try to use it on an other herb. If the herbs can create a cover, you will see an Alchemy > submenu... select mix.
[ Healing Cover Cotton ]
Finishing, Improving and Repairing
Improving and Finishing items works pretty much the same way as creating them, except that you may need special tools or items for the job. To see what your unfinished clay bowl needs, examining it will tell you what it is.
Your clay bowl will probably have to be molded with a wooden spatula or a clay shaper. You need to make the clay shaper or spatula from a wooden shaft, which you get by using a carving knife on a log. You should know how to do this by now.
- Finishing: Activate the required item and rightclick the unfinished bowl, if it's the correct item there will be an option that says Mold or Water ,depending on the item, on the top of the menu. Keep an eye on the event log to see what it needs next.
- Improving: Improving works the same way as finishing, except that the option is under the 'improve' submenu.
- Repairing: Repairing is done on the improvement submenu and will completely repair the item, but take in mind that repairing lowers the quality of the item. In most cases it's just a simple click, but some items and structures requires raw materials or heat to be repaired. It's important to keep your equipment in good condition as they take damage while you use them. An item is destroyed when it reaches 100 damage.
[ Shaft | Wooden spatula | Wooden clay shaper | Repairing ]
Trading
Rightclick a player or an NPC and choose Trade in the dropdown. If you find the trading process difficult to understand, then this section is for you.
Bear in mind there are no traders in the Golden Valley server.
It has four components;
- Traders offer This is what the person/NPC has to offer you.
- Your offer This is what you offer the trader, drag stuff into it from your inventory.
- Your demand This is what you want from the trader, drag the stuff you want from the traders offer into your demand.
- Traders demand This is what the trader wants from you.
Trader NPCs back in the trading center next to the bistro will both offer and demand items, while Merchant NPCs only sells items for money.
Trader NPC
Drag your things into your offer box and the Trader will take what he believe is valuable into his demand, if it is valuable enough, the Trader will put money in your demand box.
Drag things from the Traders offer into your demand and he will tell you in your event log how much monies he wants for the items. Drag your money (Or valuable items!) into your offer box and he will take them. If the trader accepts the trade, the Traders accept checkbox below its demand will be checked. You can then finish the trade by checking your accept checkbox below your demand.
Merchant NPC
Unlike the Trader NPC, the merchant will only accept money as your offer.
[ Trader | Personal Merchant ]
Mining
If you are still around the starting town area, there should be plenty of caves opened already. You just need to find an unlocked one with an iron vein inside...
...or you could do it the hard way, using your pickaxe to prospect for veins on rock and cliff tiles. (If you can't figure out how to do this, you should probably read the clay section again.)
Once you've found a good spot, start mining with your pickaxe. It will take some time to create a cave entrance, be patient. You probably won't hit a vein on your first try, so continue mining. I do suggest though that you look for an already opened cave.
After you've found a vein, use your pickaxe to mine some iron ore. You are going to need quite a bit of it, so go for about 4 or 5 units of it. For each 20 kilo ore you mine you will get 1 kilo of iron when you've smelted the ore.
[ Prospecting | Mining | Iron ore ]
Blacksmithing
You've come this far, good. It's time to make yourself some tools.
But in order to make tools, you need pure iron.
Take the ore you gathered earlier and put it in a fire, preferably a lit forge. Once the ore gets glowing hot it will eventually turn into pure iron lumps which can be used in smithing.
While the metals are heating up, make a wooden mallet using a shaft and a mallet head, which is carved from another shaft.
Once the metal has heated up, take the glowing hot iron lumps and combine them into a single large lump, then use the mallet on the lump to create a small anvil. You can then use the small anvil on iron lumps to create various tools and items.
[ Blacksmithing | Forge | Mallet | Iron lump | Small Anvil ]
Building a forge
To make a forge, you first need to create an iron stone chisel using your anvil. You can then use the stone chisel to create stone bricks from rock shards. Use a stone brick on some clay to create a forge.
If you succeed, you will create an unfinished forge on the ground. Examine it and it'll tell you what it needs. Activate the clay/bricks and use them on the unfinished forge to continue it.
[ Iron stone chisel | Stone Brick ]
Fighting
Even though the fighting in wurm is not a great experience, it is good to know how to do it.
Equip your shortsword in your right hand, and put the wooden shield on your left arm, not your hand.
Items equipped in your right hand will be used as the primary weapon while fighting, and left, your secondary weapon.
Shields are equipped on your left arm and will help you block attacks, and also perform the shieldbash action. However, you can't use your secondary weapon while wearing a shield.
Picking a fight
You don't want to fight a player on the golden valley you are on now, as this is not even possible. See if you can find a weak animal such as a hen, chicken or even a pig. Do mind though that creatures with a red outline might attack you on sight.
Walk up close to the creature, select Attacks > Attack from the dropdown. You will begin fighting. Not much will happen in the even window, so rightclick the animal or any nearby tile and select modes > spam mode. Spam mode will show all the misses and attack attempts in the event log. You can turn it off the same way you turned it on.
Butchering
If the animal is dead, you can then use a butchering knife on the corpse to get meat and other items. Butchering is easy, but the fail rate is high.
[ Fighting | Shortsword | Butchering knife | Butchering ]
Death
When you die, if you die, your view will be all red and a popup window will ask you where you want to spawn. Unless you're a citizen of a village or own a homestead, you will only have one option on the list.. Start.
When you respawn, you will have lost all your items (except for the starting ones if you had them in your inventory!) and you will be left starving and thirsty. If you are lucky, you may still be able to get food from the New Town bistro. Else, you will have to take your foraging skill into work.
You can still retrieve your lost items if you can find your corpse. Your corpse will stay for some time, and no one can legally take anything from it. But, once the time runs out, your corpse will have decayed and all that is left is a pile of tools where everyone is free to take.
The End
You have reached the end of this tutorial, give yourself a round of applause! (Yes, you can do that too. Rightclick your body in the inventory...)
You should now have enough knowledge to get around. If you feel you need more info, use the search bar in the wiki.
Some final Articles...
Some final articles you may want to take a look at.
- The %22how do I build a house%3F%22 guide. - You will eventually want one, this is the place to start.
- Abbreviations - They are just good to know.
Credits
Thanks goes to (in no specific order)
- Foo
- Sporhund
- Rolf and the entire dev team
- And last but not least, all of you who has asked for help and those who read this guide
