Difference between revisions of "Historical:Tutorial"
m (Added some wiki links) |
m (Restore historical link) |
||
| (46 intermediate revisions by 21 users not shown) | |||
| Line 1: | Line 1: | ||
| − | + | {{guide}} | |
| − | |||
| − | Welcome to the | + | [[Image:WurmPanorama.jpg|right|thumb|640px|Welcome to the [[Maps|World of the Wurm]].]] |
| + | = Wurm Online Tutorial = | ||
| − | + | Welcome to the unofficial [[Wurm Online]] tutorial. This tutorial will teach you how to feed yourself and how crafting works in the world of the Wurm. You are currently reading the Wurm Wiki, which is an encyclopedia of information about the game. The Wiki is a collaborative effort by Wurm players and developers. In the Wiki you will find many different types of information such as tutorials, fan fiction and lore, [[map]]s of the world, and descriptions of [[town]]s and [[item]]s. If you cannot find the information you require in the wiki, then you can request help in-game using the "[[Freedom]]" and "PA Help" chat tab. | |
| − | + | Some of the information printed here is covered in more depth in the [[Basic_Knowledge|Basic Knowledge]] article. | |
| − | [[ | + | <br style="clear:both;"/> |
| − | == | + | == The Interface == |
| − | [[Image:Tutorial | + | [[Image:Tutorial Menubar.jpg|right|thumb|HUD Status Bars]] |
| − | + | First of all is the interface (or user interface--UI--or graphical user interface--GUI). In the upper left corner of the game window you will see some text and a few coloured bars. | |
| − | |||
| − | |||
| − | Hit F2 on your keyboard to show a list of your | + | === Skills === |
| + | [[Image:Tutorial Skills.jpg|right|thumb|Skill List]] | ||
| + | Hit F2 on your keyboard to show a list of your [[skill]]s. There are 4 main categories in this window, [[characteristics]], [[religion]], [[:Category:Skills|skills category]], and spell effects. The characteristic sub-skills are values representing the current state of your [[body]], [[mind]], and [[soul]]. For instance, to be able to attack anything, your body characteristic must be at least 1.5, or you will be too weak. Each sub-characteristic is again divided into several sub-sub characteristics, which have their own functions. For instance, the maximum amount of [[weight]] you can carry is determined by your [[body strength]]. | ||
| − | Religion skills consist of 3 things, [[faith]], [[favour]] and [[alignment]]. Alignment basically says whether you are good or evil, this is determined by the actions you do. Some [[gods]] won’t accept your [[Praying|prayers]] if you are evil for instance. Faith is a measure of how much your chosen gods like you, e.g. how much power they bestow in you. Faith is increased by praying at an altar dedicated to your chosen god, although it is capped at 30 for players who does not wish to become [[priest | + | Religion skills consist of 3 things, [[faith]], [[favour]], and [[alignment]]. Alignment basically says whether you are good or evil, this is determined by the actions you do. Some [[gods]] won’t accept your [[Praying|prayers]] if you are evil for instance. Faith is a measure of how much your chosen gods like you, e.g. how much power they bestow in you. Faith is increased by praying at an [[altar]] dedicated to your chosen god, although it is capped at 30 for players who does not wish to become [[priest]]s. Priests are dedicated to following the will of their gods, and as such, a priest has the ability to cast his or her god’s [[:Category:Spells|spell]] at the cost of favour. Favor is the equivalent of [[wikipedia:mana|mana]] in many other role-playing games. Favor is only regained over time once used, so it should be used wisely. Note that [[Golden Valley]] have no religion, so the religion skill can not be used until you buy premium and move to the premium servers, [[Wild]] and [[Freedom]]. |
| − | The [[Category:Skills|skills category]] is by far the most interesting | + | The [[:Category:Skills|skills category]] is by far the most interesting as it lists all the skills you have discovered, as well as a number representing your expertise within that skill. As your skills increase you will find that the various tasks in the game becomes easier, and you will make better and better items. Skills [[decay]] when you [[die]], so take good care of yourself as your skills are the most valuable thing you have. Due to the time it takes to reach mastery in any given skill, it is important to specialize if one wants to have high skills. |
Spell effects, or “[[:WikiPedia:Buff (MMORPG terminology)|buffs]]” as they are known in other games, are temporary magical effects that affect your character. | Spell effects, or “[[:WikiPedia:Buff (MMORPG terminology)|buffs]]” as they are known in other games, are temporary magical effects that affect your character. | ||
| − | == | + | === Inventory === |
| − | [[Image:Tutorial Inventory.jpg| | + | [[Image:Tutorial Inventory.jpg|right|thumb|Inventory Menu]] |
| − | The inventory menu contains 2 | + | The inventory menu (F3) contains 2 trees: ''body'' and ''[[inventory]]''. Your inventory is where you carry the [[item]]s you start with, create, and pick up. Your body is where your equipped items are placed, as well as where [[wound]]s will be located when you take damage. If you click the ''+'' next to your body you will see your various body parts as well as what they contain of wounds or equipment. The “Active:” on the bottom shows which tool or item you are currently using. To activate an item, double left-click on it. |
| − | + | ||
| + | === Status Bars === | ||
| + | [[Image:Tutorial Menubar.jpg|right|thumb|Status Bars]] | ||
| + | Underneath the white text are 3 coloured bars. The green one is your stamina bar and tells you how much energy you have left to do actions. When you perform an action, your [[stamina]] will go down and you will need to wait for it to recharge before you do another action, or the action will take much longer to finish. Tired people work slower. The speed with which your stamina bar recharges is determined by your [[food]] and [[water]] bars--the orange and blue ones underneath the stamina bar. You can refill your water bar by drinking water from a [[Water tiles|tile with water on it]], or from a [[container]] in your inventory, a fountain, or any other external container with water in it. The food bar is refilled by eating; how to get food is explained later in the tutorial. | ||
| + | |||
| + | All actions except for moving are done by right-clicking. Try right-clicking a few things to see what options are available. Once the right-click menu has loaded, you will at the bottom of it see an option saying “What’s this?” Clicking this will open an in-game window with an explanation of the item you right-clicked on. | ||
| − | [[Image:Tutorial | + | === Chat and Events === |
| + | [[Image:Tutorial Chatboxes.jpg|right|thumb|Chat & Event boxes]] | ||
| + | The interface also consists of 2 text boxes, one for talking with other players, the other for the game to deliver messages to you. The "Local" tab is for chatting to people that are near you, you can see which people can see your messages in the list in the right side of the first box. The "Jenn-Kellon" tab is a global chat for all players of the same [[kingdom]] on your server. If you wish to send a message that only one other player can see, you can type in <em>“/t playername message”</em> to open a tab where you and <em>“playername”</em> can chat together in private. | ||
| − | + | The "Event" chat is, as mentioned, where you receive information from the game. If you fail or succeed an action, get attacked, or the server is shutting down, this is where you can find the information. The buttons underneath it are used for toggling your status. “[[Climbing]]” will enable you to go up steep [[slope]]s, but it will heavily reduce your stamina, and you can not regain stamina while climbing. "[[Faithful]]" allows you to do actions that your god frowns upon, although you will lose some faith from it. When "[[Lawful]]" is activated, it will prevent you from doing illegal things. If you go unlawful, you can [[steal]] items, but be warned, guards do not like thieves. | |
| − | + | The text next to the Lawful button displays more of your current status. The first word is your current fighting style, the rest can be either a warning about low stamina, low or high food and low water levels. | |
| + | <br style="clear:both;"/> | ||
| + | == First Steps == | ||
| + | * Move about with the keys W, S, A and D keys. Turn by holding the left mouse button and moving the mouse. There is no jump key; movement in Wurm is very simplistic. | ||
| + | * You will start the game in a tutorial area on the Independence server. At the end of the tutorial, you will be able to use a portal to move to a player server. ''Please review [[Server types]] to understand the differences between the various servers.'' The starting town that you will arrive at from the portal you choose will be a relatively safe haven for new players, but as soon as you leave it you must be wary of the many [[creatures]] that inhibit the lands of Wurm. | ||
| + | * Take your bearings using the [[settlement token]] in the center of your starting town. On top of the token is a [[compass]]. | ||
| + | * If you get attacked by a [[creature]], try to flee into water. Only a few animals ([[Large Rat|rats]], [[Brown Bear|bears]] and [[Crocodile|crocodiles]]) can pursue you across water. | ||
| + | * Village guards will attack creatures that enter [[deed]]ed land so if you can make it into a deeded area (such as your starting town) you should be safe. | ||
| + | * For the first 24 hours of your Wurm playing time (real-life time spent in-game) you can get free food at the bartenders in the starting town and your "built-in" light source will always stay on. | ||
| − | + | However, after 24 hours have passed, you must obtain food via cooking or trade and you will not have a light source. Hence, it is wise to spend time learning to feed yourself and aquiring a light source. For cooking you will need a few items: | |
| − | + | # Pottery bowl | |
| − | + | # Ingredients | |
| − | + | # Fire | |
| − | The | + | The equipment in your [[inventory]] when you begin the game will enable you to obtain these items. |
| − | + | === 1. Ingredients === | |
| + | [[Image:Tutorial Nature.jpg|right|thumb|Foraging grass for food]] | ||
| + | * To [[Foraging|forage]] for food ingredients, find a patch of [[grass]], and right-click on a grass tile then select ''Nature > Forage''. | ||
| + | * You will have to forage many different grass patches to obtain ingredients, and it's best to move away from densely populated areas for this, as each grass patch can only be foraged once in any 24-hour real-life period. Hence, you need to find grass that nobody has foraged in the last 24 hours. | ||
| + | * Find a few berries, nuts, and herbs before moving on to stage 2 of this tutorial. | ||
| + | |||
| + | === 2. Pottery Bowl === | ||
| + | [[Image:Tutorial Clay.jpg|right|thumb|Digging for [[Clay]].]] | ||
| + | [[Image:Tutorial Pottery.jpg|right|thumb|Creating a bowl]] | ||
| + | # You will need [[clay]] to make a [[pottery bowl]]. Clay is found near water. | ||
| + | # There are clay tiles just outside of Newtown located to the north and east by the edge of the water. | ||
| + | # Once you find a clay tile, open your inventory and double-click your [[shovel]] to 'activate' it. | ||
| + | # With the shovel active, right-click on a clay tile and select ''dig''. | ||
| + | # You should then obtain a piece of clay in your inventory. Find your ''right hand'' in the ''Body'' inventory and double-click it to make it active. | ||
| + | # Right-click on the clay and select ''Create > Containers > [[Clay bowl]]''. | ||
| + | # If creation of the bowl fails, repeat the steps until you succeed. If you make an unfinished clay bowl, keep trying until you make a finished one. As with anything else in Wurm, you will fail often when first trying something. Be patient and keep trying. | ||
| + | # Make a few clay bowls and perhaps also a [[clay jar]] while you're at it. | ||
| + | # Clay bowls must be fired into pottery bowls before they become useful. | ||
| − | |||
| − | |||
| − | |||
| − | |||
| − | |||
| − | |||
| − | |||
| − | |||
| − | |||
| − | |||
| − | |||
| − | |||
| − | |||
| − | |||
| − | |||
| − | |||
| − | |||
| − | |||
| − | |||
| − | |||
| − | |||
| − | |||
| − | |||
| − | |||
| − | |||
| − | |||
| − | |||
| − | |||
| − | |||
| − | |||
| − | |||
| − | + | === 3. Fire === | |
| + | [[Image:Tutorial Trees.jpg|right|thumb|A Tree]] | ||
| + | [[Image:Tutorial Cutting.jpg|right|thumb|Chopping down a tree]] | ||
| + | [[Image:Tutorial Kindling.jpg|right|thumb|Creating Kindling]] | ||
| + | [[Image:Tutorial Campfire.jpg|right|thumb|Creating a Campfire]] | ||
| + | [[Image:Tutorial Fire.jpg|right|thumb|A Lit Campfire]] | ||
| + | [[Image:Tutorial Casserole.jpg|right|thumb|Casserole ingredients in a bowl]] | ||
| − | + | # You need to obtain [[kindling]] to light a [[fire]]. Activate a [[small axe]] and find a [[tree]]. Examine the trees by right-clicking the ground around them and selecting ''Examine''. Pick an old or very old tree (preferably), and avoid fruit trees as they provide fruit (food) when in [[season]] and don't provide much wood anyway. Bushes will ''not'' provide wood so please don't cut them down as they are harvestable too. | |
| + | # Right-click the tree and ''Cut down''. When the tree is down, right-click the [[felled tree]] and chop it up into [[log]]s. | ||
| + | # With a log in your [[inventory]] (right-click > ''Take''), right-click the log and ''Create > Misc > Kindling''. Repeat until successful. Make a few spare for later as they're always useful. | ||
| + | # Activate a [[steel and flint]], then right-click the kindling and create a campfire. Once it's lit, activate some of the wood scraps you made while creating kindling and right-click the fire. Burn the scraps to keep the fire going (Most wooden items can be burned to fuel a fire). See [[Firemaking]]. | ||
| + | # You will need to fuel the fire with about 20 kg of wood every hour or so, you can see its status by examining. If it does not say “The fire burns steadily and will burn for a long time.” You need to put on fuel by activating wood (or substitute) and right-clicking the fire, then selecting burn. | ||
| − | [[ | + | === 4. Completing the Bowls === |
| + | # Put your empty clay bowls into the fire. Right-click the fire and select ''Open'', then drag the clay bowls across from your inventory. | ||
| + | # The bowls will take quite a while to heat up to [[glowing hot]] and become pottery. While they do this, you can try making some different items from your log, botanize and forage more, or do something completely different, just make sure to examine the fire from time to time to see if it needs [[fuel]]. | ||
| + | # It is a good idea to put all your berries, nuts, and herbs into the fire as well (not inside the bowls), so they can heat up. This reduces the time needed to make food when you put them into the finished bowls. | ||
| + | # Once the clay bowls have turned into a pottery bowls (this will happen once the clay bowl has been glowing from heat for a while) take it out of the fire along with the ingredients. | ||
| − | + | === 5. Cooking a Casserole === | |
| + | # Drag one berry and one herb onto each pottery bowl in your inventory so they are located inside the bowl. Examine the bowl and it should mention the 'difficulty' of the casserole you're about to cook. | ||
| + | # Put the pottery bowls containing casserole ingredients back into the fire. | ||
| + | # Keep checking the bowl in the fire until the contents of the bowl turn into "Casserole". If you see the word “casserole” when you click the +, you have successfully made your first item of food. | ||
| + | # Take the pottery bowl out of the fire and eat the casserole if you are hungry. Otherwise, store the casserole in your inventory for later, but if you are logging of its a better idea to store it in a container. | ||
| + | As you cook more food, your skill will increase and you will make better and better food. Once you gain access to [[meat]], [[fish]], and [[vegetable]]s and have a [[frying pan]], you can start making food with other ingredients. | ||
| − | + | == What Next? == | |
| + | * Obtaining a [[fishing rod]] will give you access to a reliable method of obtaining meat, which is important for creating quality food. | ||
| + | * You can chop down a few trees to make (and improve) [[wooden spindle]]s, and later sell them to the [[trader]] where you started. From the [[money]] you earn, you can buy food, tools, and [[weapon]]s at the various traders. | ||
| + | * You can create a [[butchering knife]] if you find some ore to smelt and make a small anvil so you can get [[pelt]]s and food from killed creatures. | ||
| + | * If you are lucky and ask around, you might be introduced to a nice [[village]] or neighborhood to live. | ||
| + | [[Category:Guides]] | ||
[[Category:Babel/T]] | [[Category:Babel/T]] | ||
Latest revision as of 22:02, 2 August 2023
| Note: This article is the opinion or suggestion of one or more players. Information in player-made guides are not maintained by the Wurmpedia staff. It is subject to player opinions, and information may not be factually accurate or up-to-date. For updated game mechanics information, check the main namespace articles. |

Contents
Wurm Online Tutorial
Welcome to the unofficial Wurm Online tutorial. This tutorial will teach you how to feed yourself and how crafting works in the world of the Wurm. You are currently reading the Wurm Wiki, which is an encyclopedia of information about the game. The Wiki is a collaborative effort by Wurm players and developers. In the Wiki you will find many different types of information such as tutorials, fan fiction and lore, maps of the world, and descriptions of towns and items. If you cannot find the information you require in the wiki, then you can request help in-game using the "Freedom" and "PA Help" chat tab.
Some of the information printed here is covered in more depth in the Basic Knowledge article.
The Interface
First of all is the interface (or user interface--UI--or graphical user interface--GUI). In the upper left corner of the game window you will see some text and a few coloured bars.
Skills
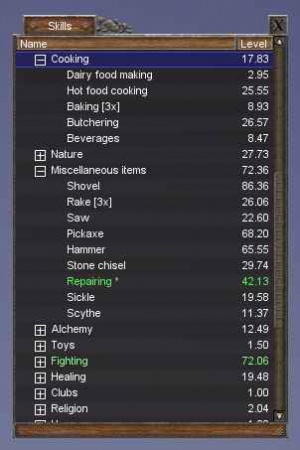
Hit F2 on your keyboard to show a list of your skills. There are 4 main categories in this window, characteristics, religion, skills category, and spell effects. The characteristic sub-skills are values representing the current state of your body, mind, and soul. For instance, to be able to attack anything, your body characteristic must be at least 1.5, or you will be too weak. Each sub-characteristic is again divided into several sub-sub characteristics, which have their own functions. For instance, the maximum amount of weight you can carry is determined by your body strength.
Religion skills consist of 3 things, faith, favour, and alignment. Alignment basically says whether you are good or evil, this is determined by the actions you do. Some gods won’t accept your prayers if you are evil for instance. Faith is a measure of how much your chosen gods like you, e.g. how much power they bestow in you. Faith is increased by praying at an altar dedicated to your chosen god, although it is capped at 30 for players who does not wish to become priests. Priests are dedicated to following the will of their gods, and as such, a priest has the ability to cast his or her god’s spell at the cost of favour. Favor is the equivalent of mana in many other role-playing games. Favor is only regained over time once used, so it should be used wisely. Note that Golden Valley have no religion, so the religion skill can not be used until you buy premium and move to the premium servers, Wild and Freedom.
The skills category is by far the most interesting as it lists all the skills you have discovered, as well as a number representing your expertise within that skill. As your skills increase you will find that the various tasks in the game becomes easier, and you will make better and better items. Skills decay when you die, so take good care of yourself as your skills are the most valuable thing you have. Due to the time it takes to reach mastery in any given skill, it is important to specialize if one wants to have high skills.
Spell effects, or “buffs” as they are known in other games, are temporary magical effects that affect your character.
Inventory
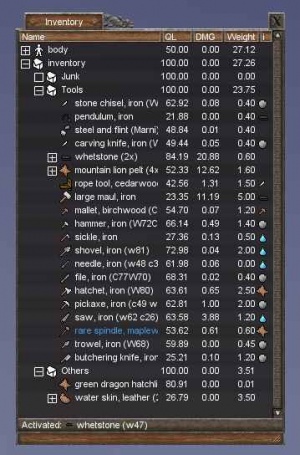
The inventory menu (F3) contains 2 trees: body and inventory. Your inventory is where you carry the items you start with, create, and pick up. Your body is where your equipped items are placed, as well as where wounds will be located when you take damage. If you click the + next to your body you will see your various body parts as well as what they contain of wounds or equipment. The “Active:” on the bottom shows which tool or item you are currently using. To activate an item, double left-click on it.
Status Bars
Underneath the white text are 3 coloured bars. The green one is your stamina bar and tells you how much energy you have left to do actions. When you perform an action, your stamina will go down and you will need to wait for it to recharge before you do another action, or the action will take much longer to finish. Tired people work slower. The speed with which your stamina bar recharges is determined by your food and water bars--the orange and blue ones underneath the stamina bar. You can refill your water bar by drinking water from a tile with water on it, or from a container in your inventory, a fountain, or any other external container with water in it. The food bar is refilled by eating; how to get food is explained later in the tutorial.
All actions except for moving are done by right-clicking. Try right-clicking a few things to see what options are available. Once the right-click menu has loaded, you will at the bottom of it see an option saying “What’s this?” Clicking this will open an in-game window with an explanation of the item you right-clicked on.
Chat and Events
The interface also consists of 2 text boxes, one for talking with other players, the other for the game to deliver messages to you. The "Local" tab is for chatting to people that are near you, you can see which people can see your messages in the list in the right side of the first box. The "Jenn-Kellon" tab is a global chat for all players of the same kingdom on your server. If you wish to send a message that only one other player can see, you can type in “/t playername message” to open a tab where you and “playername” can chat together in private.
The "Event" chat is, as mentioned, where you receive information from the game. If you fail or succeed an action, get attacked, or the server is shutting down, this is where you can find the information. The buttons underneath it are used for toggling your status. “Climbing” will enable you to go up steep slopes, but it will heavily reduce your stamina, and you can not regain stamina while climbing. "Faithful" allows you to do actions that your god frowns upon, although you will lose some faith from it. When "Lawful" is activated, it will prevent you from doing illegal things. If you go unlawful, you can steal items, but be warned, guards do not like thieves.
The text next to the Lawful button displays more of your current status. The first word is your current fighting style, the rest can be either a warning about low stamina, low or high food and low water levels.
First Steps
- Move about with the keys W, S, A and D keys. Turn by holding the left mouse button and moving the mouse. There is no jump key; movement in Wurm is very simplistic.
- You will start the game in a tutorial area on the Independence server. At the end of the tutorial, you will be able to use a portal to move to a player server. Please review Server types to understand the differences between the various servers. The starting town that you will arrive at from the portal you choose will be a relatively safe haven for new players, but as soon as you leave it you must be wary of the many creatures that inhibit the lands of Wurm.
- Take your bearings using the settlement token in the center of your starting town. On top of the token is a compass.
- If you get attacked by a creature, try to flee into water. Only a few animals (rats, bears and crocodiles) can pursue you across water.
- Village guards will attack creatures that enter deeded land so if you can make it into a deeded area (such as your starting town) you should be safe.
- For the first 24 hours of your Wurm playing time (real-life time spent in-game) you can get free food at the bartenders in the starting town and your "built-in" light source will always stay on.
However, after 24 hours have passed, you must obtain food via cooking or trade and you will not have a light source. Hence, it is wise to spend time learning to feed yourself and aquiring a light source. For cooking you will need a few items:
- Pottery bowl
- Ingredients
- Fire
The equipment in your inventory when you begin the game will enable you to obtain these items.
1. Ingredients
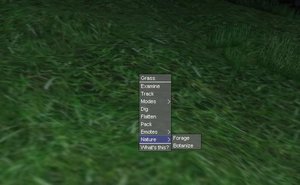
- To forage for food ingredients, find a patch of grass, and right-click on a grass tile then select Nature > Forage.
- You will have to forage many different grass patches to obtain ingredients, and it's best to move away from densely populated areas for this, as each grass patch can only be foraged once in any 24-hour real-life period. Hence, you need to find grass that nobody has foraged in the last 24 hours.
- Find a few berries, nuts, and herbs before moving on to stage 2 of this tutorial.
2. Pottery Bowl
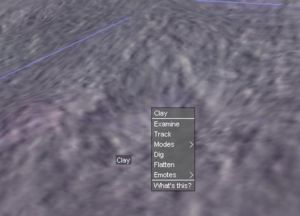
- You will need clay to make a pottery bowl. Clay is found near water.
- There are clay tiles just outside of Newtown located to the north and east by the edge of the water.
- Once you find a clay tile, open your inventory and double-click your shovel to 'activate' it.
- With the shovel active, right-click on a clay tile and select dig.
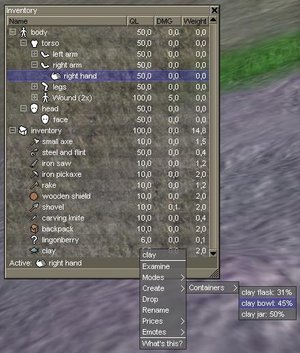
- You should then obtain a piece of clay in your inventory. Find your right hand in the Body inventory and double-click it to make it active.
- Right-click on the clay and select Create > Containers > Clay bowl.
- If creation of the bowl fails, repeat the steps until you succeed. If you make an unfinished clay bowl, keep trying until you make a finished one. As with anything else in Wurm, you will fail often when first trying something. Be patient and keep trying.
- Make a few clay bowls and perhaps also a clay jar while you're at it.
- Clay bowls must be fired into pottery bowls before they become useful.
3. Fire
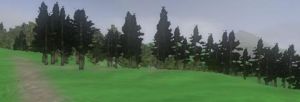
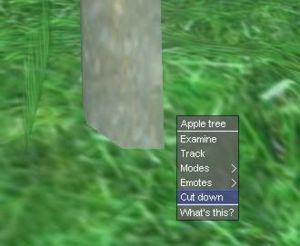
- You need to obtain kindling to light a fire. Activate a small axe and find a tree. Examine the trees by right-clicking the ground around them and selecting Examine. Pick an old or very old tree (preferably), and avoid fruit trees as they provide fruit (food) when in season and don't provide much wood anyway. Bushes will not provide wood so please don't cut them down as they are harvestable too.
- Right-click the tree and Cut down. When the tree is down, right-click the felled tree and chop it up into logs.
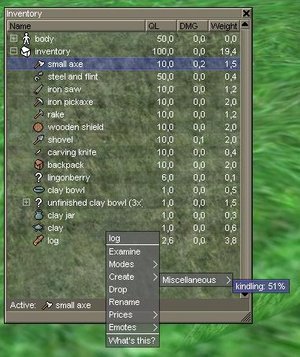
- With a log in your inventory (right-click > Take), right-click the log and Create > Misc > Kindling. Repeat until successful. Make a few spare for later as they're always useful.
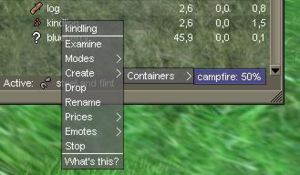
- Activate a steel and flint, then right-click the kindling and create a campfire. Once it's lit, activate some of the wood scraps you made while creating kindling and right-click the fire. Burn the scraps to keep the fire going (Most wooden items can be burned to fuel a fire). See Firemaking.
- You will need to fuel the fire with about 20 kg of wood every hour or so, you can see its status by examining. If it does not say “The fire burns steadily and will burn for a long time.” You need to put on fuel by activating wood (or substitute) and right-clicking the fire, then selecting burn.
4. Completing the Bowls
- Put your empty clay bowls into the fire. Right-click the fire and select Open, then drag the clay bowls across from your inventory.
- The bowls will take quite a while to heat up to glowing hot and become pottery. While they do this, you can try making some different items from your log, botanize and forage more, or do something completely different, just make sure to examine the fire from time to time to see if it needs fuel.
- It is a good idea to put all your berries, nuts, and herbs into the fire as well (not inside the bowls), so they can heat up. This reduces the time needed to make food when you put them into the finished bowls.
- Once the clay bowls have turned into a pottery bowls (this will happen once the clay bowl has been glowing from heat for a while) take it out of the fire along with the ingredients.
5. Cooking a Casserole
- Drag one berry and one herb onto each pottery bowl in your inventory so they are located inside the bowl. Examine the bowl and it should mention the 'difficulty' of the casserole you're about to cook.
- Put the pottery bowls containing casserole ingredients back into the fire.
- Keep checking the bowl in the fire until the contents of the bowl turn into "Casserole". If you see the word “casserole” when you click the +, you have successfully made your first item of food.
- Take the pottery bowl out of the fire and eat the casserole if you are hungry. Otherwise, store the casserole in your inventory for later, but if you are logging of its a better idea to store it in a container.
As you cook more food, your skill will increase and you will make better and better food. Once you gain access to meat, fish, and vegetables and have a frying pan, you can start making food with other ingredients.
What Next?
- Obtaining a fishing rod will give you access to a reliable method of obtaining meat, which is important for creating quality food.
- You can chop down a few trees to make (and improve) wooden spindles, and later sell them to the trader where you started. From the money you earn, you can buy food, tools, and weapons at the various traders.
- You can create a butchering knife if you find some ore to smelt and make a small anvil so you can get pelts and food from killed creatures.
- If you are lucky and ask around, you might be introduced to a nice village or neighborhood to live.

